Recently went to an interesting UoN public lecture talk by Richard Leach, who is Professor in Metrology at the UoN Faculty of Engineering.
The talk was entitled "Metrology for additive manufacturing: the key to tight tolerances" and discussed the issues related to metrology for additively manufactured components.This post is based on the talk, with a little extra linkage thrown in.
Two Definitions
Additive Manufacturing : Processes such as 3D printing, laser sintering etc that make components "from the ground up" (Wiki here)
Metrology : Although a wide field, in this case focussing on the ability to measure the dimensions of a manufactured object to ensure that it has the shape it should have (e.g. does a nut have the correct dimensions so that it will fit onto an appropriate bolt)
Some more info
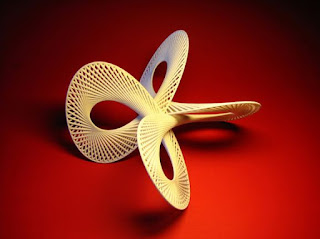
Metrology of additively manufactured(AM) parts can be particularly difficult as AM processes allow parts of have very complex geometries, for example like this :
Currently, typical techniques used for metrology include :
Co-ordinate measuring machines - which physically touch the part to check its dimensions (See also here). Accurate but slow.
Optical systems - which uses lasers etc to discern the part surface. Fast but relatively inaccurate.
X-ray systems - which can also image the inside of components - suspect accuracy
One particular issue with optical systems is that machines designed to be very accurate can only measure a small area at a time, negating the advantage that optical scanning aims to provide.
Prof Leach also mentioned that mechanical CMM machines were out of favour for metrology of very small components, adding that the F25 Micro CMM he had been involved with at NPL had not sold well and was difficult to use.
The Prof went on to describe the "Information rich metrology" approach which aimed to use available data about the object (e.g. its CAD model, construction material etc) to help optical systems better define the surface of the part.
Also mentioned was the concept of "design for metrology", for example by putting markers in the physical design where measurements should be taken.
You can read more about the additive manufacturing group here and here.
The talk was entitled "Metrology for additive manufacturing: the key to tight tolerances" and discussed the issues related to metrology for additively manufactured components.This post is based on the talk, with a little extra linkage thrown in.
Two Definitions
Additive Manufacturing : Processes such as 3D printing, laser sintering etc that make components "from the ground up" (Wiki here)
Metrology : Although a wide field, in this case focussing on the ability to measure the dimensions of a manufactured object to ensure that it has the shape it should have (e.g. does a nut have the correct dimensions so that it will fit onto an appropriate bolt)
Some more info
Metrology of additively manufactured(AM) parts can be particularly difficult as AM processes allow parts of have very complex geometries, for example like this :
 |
| A complex AM part |
Currently, typical techniques used for metrology include :
Co-ordinate measuring machines - which physically touch the part to check its dimensions (See also here). Accurate but slow.
Optical systems - which uses lasers etc to discern the part surface. Fast but relatively inaccurate.
X-ray systems - which can also image the inside of components - suspect accuracy
One particular issue with optical systems is that machines designed to be very accurate can only measure a small area at a time, negating the advantage that optical scanning aims to provide.
Prof Leach also mentioned that mechanical CMM machines were out of favour for metrology of very small components, adding that the F25 Micro CMM he had been involved with at NPL had not sold well and was difficult to use.
The Prof went on to describe the "Information rich metrology" approach which aimed to use available data about the object (e.g. its CAD model, construction material etc) to help optical systems better define the surface of the part.
Also mentioned was the concept of "design for metrology", for example by putting markers in the physical design where measurements should be taken.
You can read more about the additive manufacturing group here and here.
 |
No comments:
Post a Comment